
1. Overview
Event registration lets employees sign up for an event directly from the event page in Involv intranet. Instead of collecting names by email or in a separate form, every sign-up is stored in a SharePoint list on the events site, so the organiser always has one up-to-date overview of who is coming.
Registration is switched on per event. You decide whether people can register, whether there is a maximum number of places, whether a waitlist opens when the event is full, and whether employees can tell you they are not interested. The Event registration component on the event page shows the matching buttons and messages to each visitor.
Use event registration for anything where you need to know the number of participants in advance: trainings, team-building days, town halls with limited seats, or any event where catering, transport or materials depend on attendance.
2. What you'll learn
- How to switch on registration when you create an event
- How to set a maximum number of sign-ups, a waitlist and a "not interested" option
- Where to change the registration settings of an existing event in the page details
- How to customise the button labels and messages of the Event registration component
- What employees see when they sign up or cancel
- Where to see who has registered for an event
3. Switch on registration when you create an event
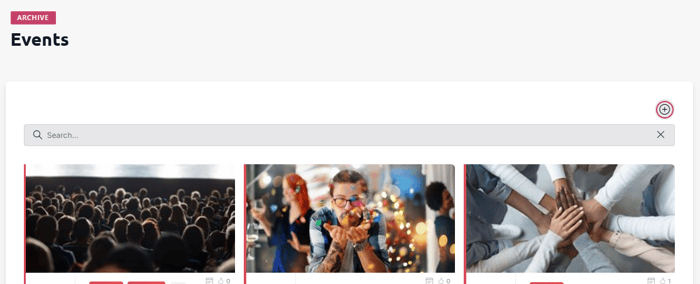
Events are created from an Events component on the events site. Turn on editor mode with the pencil icon on the left side of the page and click the plus (+) icon in the top-right corner of the Events component. Involv intranet first asks how you want to create the page: choose Normal to fill in the fields yourself, or AI Assisted to let AI draft the content, and click Confirm.
The Create event window opens. On the left you fill in the General information, on the right you pick a Layout. The Event template layout already contains the event details block and the Event registration component, so the sign-up buttons appear on the page automatically. With the Blank layout you add the component yourself.
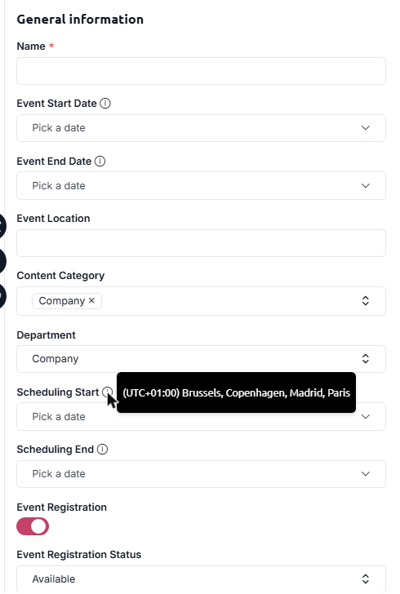
Start with the basic details of the event. Only Name is required, but the dates and location are what employees see on the event card and on the event page.
| Field | What it does |
| Name | The title of the event and of the event page. Required. |
| Event Start Date / Event End Date | Date and time of the event. The info icon shows the time zone that is used. |
| Event Location | Free text, for example a room, an address or "Online". |
| Content Category | One or more categories, used to filter and label events. See How to add an event category. |
| Department | The department the event belongs to. |
| Scheduling Start / Scheduling End | The period in which the event is shown in event overviews. Leave them empty to show the event without a time limit. |
4. Configure the registration settings
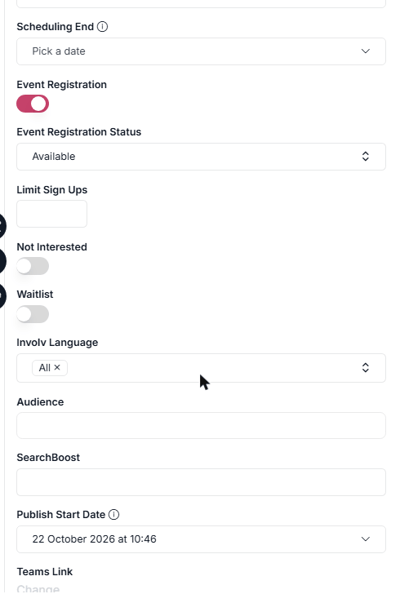
Switch on Event Registration to allow sign-ups. The registration settings appear directly below the toggle.
| Field | What it does |
| Event Registration | Turns registration on or off for this event. When it is off, the page shows no sign-up button. |
| Event Registration Status | Available accepts sign-ups. Closed stops new sign-ups and shows the message "Event is closed", for example once the registration deadline has passed. |
| Limit Sign Ups | The maximum number of participants. Leave it empty for unlimited places. |
| Not Interested | Adds a "Not interested" button, so employees can let you know they will not attend. |
| Waitlist | When the limit is reached, employees can add themselves to a waitlist instead of seeing that the event is full. |
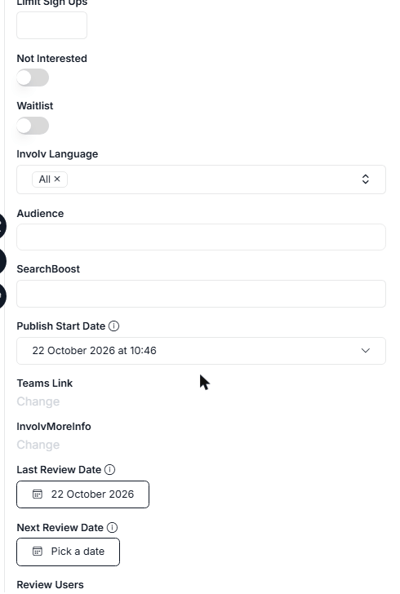
The fields below the registration settings are the same as on other Involv intranet pages. Involv Language sets for which language versions of the intranet the event is shown, Audience limits the event to specific groups, and Publish Start Date lets you schedule the publication. Last Review Date, Next Review Date and Review Users are used by content governance to remind the owner to check the page. See How to use Smart Content Intelligence.
Click Create to create the event page, open it in a new tab, add your description and images, and publish the page. See How to create an event for the full creation flow.
5. Change the registration settings of an existing event
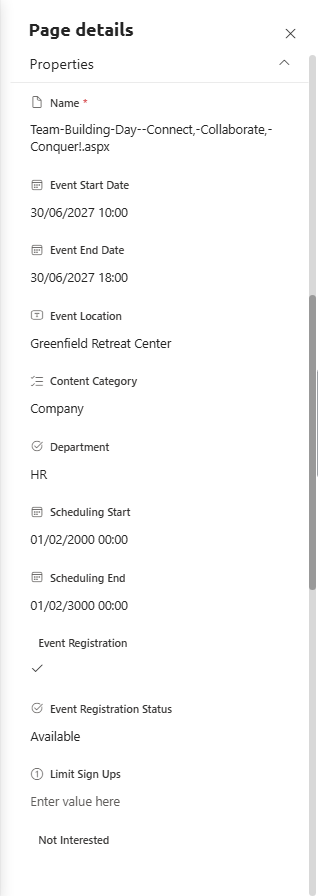
All fields from the Create event window are stored as page properties of the event page. To change them later, for example to close registration or raise the number of places, open the event page, click Edit in the top-right corner and then Page details in the toolbar. The Properties panel shows every field. Without edit mode the fields are marked (Read only). Republish the page to apply your changes.
6. Customise the buttons and messages
The texts that employees see, such as "Sign up", "Cancel" or "Too late, event is full", come from the Event registration component and can be changed per event page. In edit mode, select the component below the event details and click the settings icon (the sliders) in its toolbar. The General section lists every button label and message, each starting with "Custom -". Overwrite a text to change it, for example to use "Register" instead of "Sign up", or to translate the labels on a page in another language.
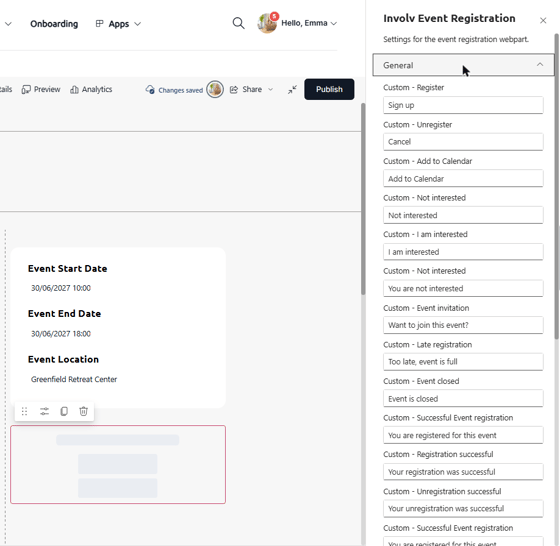
The other sections work like on any Involv intranet component: Target Audience Settings shows the component only to selected groups, and Visibility decides whether it is shown in the mobile and email view.
7. What employees see
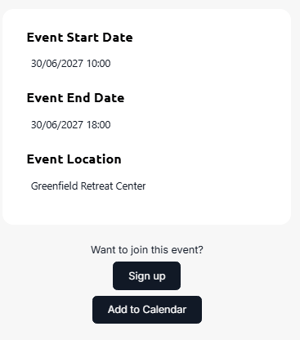
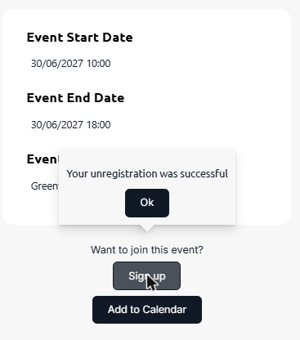
Below the event details, employees see the question "Want to join this event?" with a Sign up button and an Add to Calendar button. After clicking Sign up, a confirmation appears and the page shows "You are registered for this event". The Sign up button changes into Cancel.
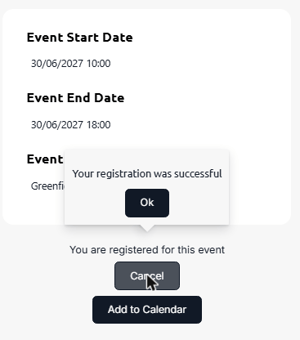
When an employee clicks Cancel, the registration is removed and the Sign up button is shown again. When the maximum number of sign-ups is reached, new visitors see "Too late, event is full", or the option to join the waitlist if the waitlist is switched on.
8. See who has registered
Every sign-up is saved in the Registrations list on the events site. Open it by adding /Lists/Registrations to the address of your events site, for example https://yourtenant.sharepoint.com/sites/Events/Lists/Registrations, or via Settings (gear icon) > Site contents > Registrations.
Each row is one person for one event:
| Column | What it shows |
| Title | The name of the employee. |
| Key | The email address of the employee. |
| Event | The event the employee registered for. |
| Registration Type | Registration, Waitlist or Not Interested. |
| Created | When the employee registered. |
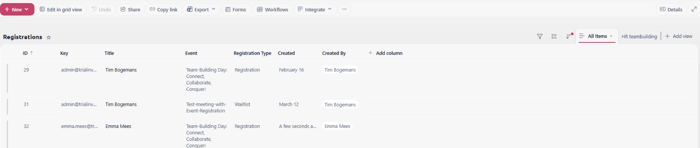
The list contains the registrations of all events on the site. To see the participants of one event, click the Event column header and filter on the event. To keep that filter, save it as a view with Save view as. Use Export to download the participants to Excel, for example to make a name list for the reception or the caterer. Cancelled registrations are removed from the list, so it always shows who is registered at that moment.
9. Result
Your event page now accepts registrations, shows the right buttons and messages to employees, and every sign-up is collected in the Registrations list, where you can filter per event and export the participants. For related topics, see How to create an event and How to configure SharePoint permissions on Involv intranet sites.
Involv version 5.4.1