
1. Overview
Custom Profile Pages in Involv allow you to control how user information is displayed across your intranet. You can choose predefined templates, adjust styling, integrate Microsoft Teams status, and define exactly which profile fields are visible or editable. This ensures profile pages align with your organization’s branding, governance rules, and user needs.
2. What you’ll learn
After completing this guide, you will be able to:
-
Add and configure the Involv Profile web part
-
Select and style profile page templates
-
Enable Microsoft Teams presence on profile pages
-
Control profile edit permissions (read-only vs editable)
-
Manage and create custom user profile fields as an admin
-
Define which user properties appear on the profile page
Let users format profile fields such as About Me with rich text
Choose the fields, sort order and grouping of the My Team section
3. Watch interactive tutorial
Step-by-step configuration
-
Click Add to insert a new web part in the first column of your page.
-
Select the Involv Profile web part and add it to the page section.
-
Click Edit properties to open the profile card configuration panel.
-
Choose the desired profile template (for example: modern layout or bordered layout).
-
Adjust the background color using the color picker if needed.
-
Enable Teams status to display the user’s current Microsoft Teams availability.
-
Toggle Show call to actions to display action buttons on the profile (for example: contact or message options).
-
Enable Read only if users should not be allowed to edit their profile information.
-
Disable Read only if profile editing should be allowed.
-
Click Open Property Panel to manage which fields appear on the profile page.
-
Review the existing profile fields displayed on the page.
-
Click Create to add a new custom field.
-
Enter a field name for the new profile attribute.
-
Select the field type from the dropdown (for example: text, choice, or other supported types).
-
Choose or configure the appropriate field options.
-
Decide whether the field is temporary or linked to an existing user property.
-
Only Intranet Admins can create new user properties.
-
-
Click Save to apply all field configuration changes.
-
Open Admin Profile settings.
-
Navigate to User profiles.
-
Select Manage user properties.
-
Create new properties or modify existing ones as required.
-
Close the configuration panel once changes are completed.
-
Review the profile page to confirm layout, fields, and permissions are correctly applied.
Congratulations — your custom profile page is now fully configured and ready for use.
4. Let users format profile fields with rich text
Since Involv intranet 5.4.1, a profile field can use the field type Richtext. Users then edit that field in the Involv rich text editor, and the formatting they add is shown on the profile page. This is useful for About Me, where colleagues introduce their role and projects: structured text is easier to read than one long block.
Click Open Property Panel in the web part settings, find the field and set its Field type to Richtext. Then click Save. Rich text only works when the user profile property behind the field is an HTML field in SharePoint, such as About Me. Custom properties work too, as long as they are of the HTML type.
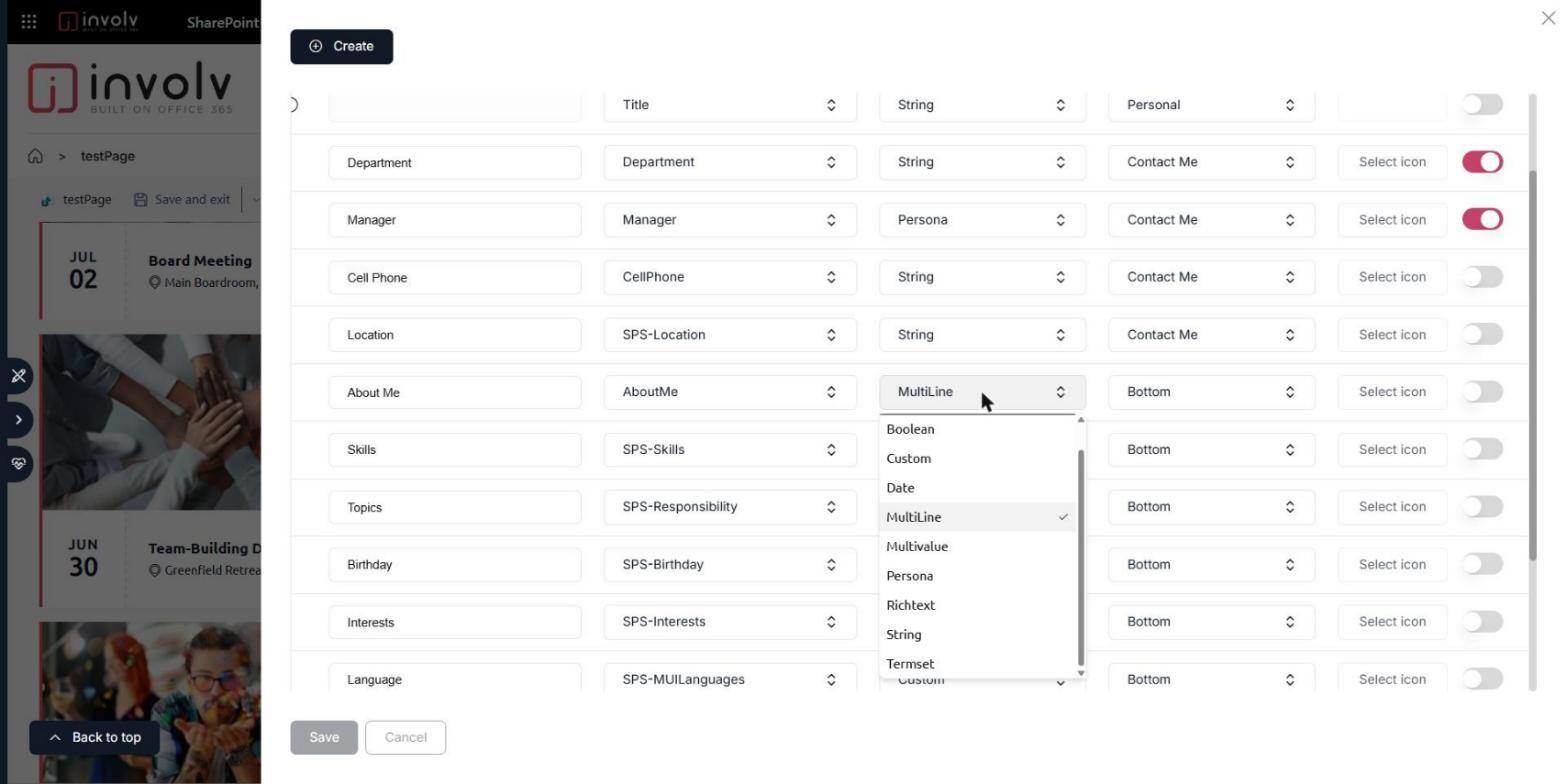
The Involv mobile app shows the text of these fields without the formatting.
5. Choose the fields, sorting and grouping of My Team
The My Team section shows the colleagues around a user. Since Involv intranet 5.4.1, you decide what each person card shows and how the people are ordered. Open the web part settings and expand Team.
Under Team source, choose whether the team is read from Graph or from Search; the options below work with both. In Select Properties, type a user property such as JobTitle or Department and click Add. Every property you add appears on the person cards, in the order of the list: use the arrows to change the order and the cross to remove a property.
In Sort by, add the properties that decide the order of people on the same level, and switch Ascending on or off for each one. When you add more than one, the first property is applied first. To show a label per group, enter one property in Group by property, for example Department: My Team then shows the department name with the people of that department below it.
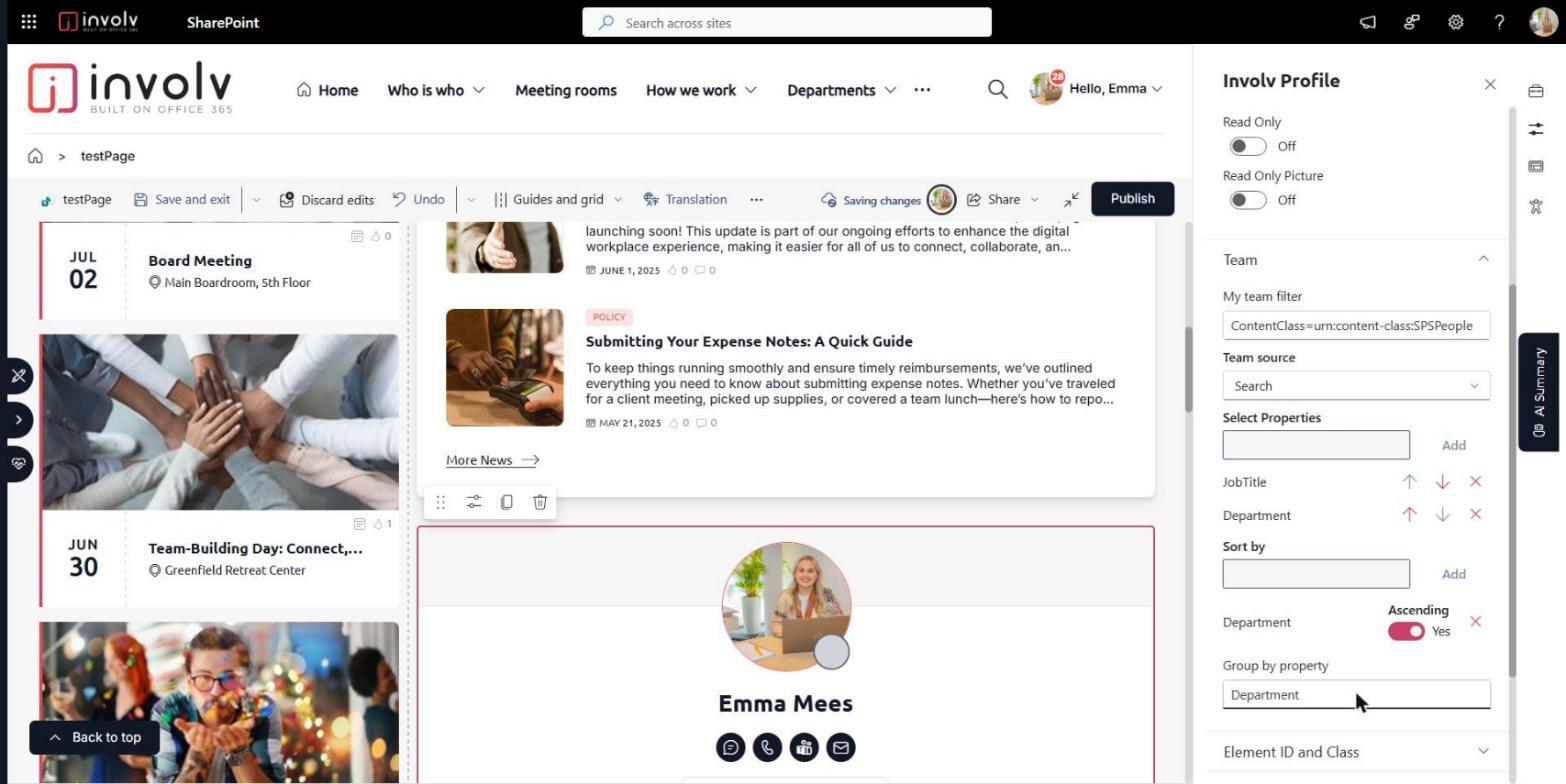
When a user opens a person in My Team, only that person's team expands. These options are not yet available in the Org Chart web part.
Watch the interactive demo below to follow these settings step by step.
Involv version 5.4.1