
1. Overview
The Involv Rich Text Editor component is a content area you write in directly on the page, with a full toolbar above it. Use it for formatted articles, custom content sections, headings, links and structured paragraphs, where a standard page text section gives you too little control.
Think of a policy that needs a clear structure, an instruction with numbered steps, or a section that has to keep the same layout on several pages. The component works on Involv intranet sites and on standard SharePoint sites.
2. What you'll learn
- How to add the Involv Rich Text Editor component to a page
- How to format your content with the toolbar
- How to work in the HTML with Edit code
- How to set the placeholder text
- Where to limit the component to a specific audience
3. Add the component to a page
Open the page in edit mode and click the + to add a component. Search for Involv Rich Text Editor and select it. The content area appears immediately, with the toolbar above it, and you can start typing.
4. Write and format your content
The toolbar carries what you expect from a text editor, grouped from left to right: headings H2, H3 and H4, then bold, italic, underline and strikethrough, then alignment, links, indentation, quotes, numbered and bulleted lists, tables, colours, and undo and redo at the end.

Work the way you would in Word: type your text first, then select a piece and click the formatting you want. Start with H2 for a heading, because H1 is the title of the page itself, and your headings should sit underneath it.
Do not paste HTML into the content area. Paste a piece of code such as <p> or <a href> straight into the text and the tags end up on the page as literal text, visible to your visitors. In the content area you type text and click formatting, nothing more.
5. Work in the HTML with Edit code
The </> button on the far right of the toolbar is Edit code. Click it and the content area switches to the HTML behind your text, with line numbers and syntax colouring. You will see that the editor writes clean markup: your heading becomes an <h2> with an id derived from the text, your paragraphs become <p> elements.

This is the place to be when you need to work in HTML: to correct a detail the toolbar cannot reach, or to check what exactly ended up in your content. Click the button again to go back to the normal view.
6. Set the placeholder
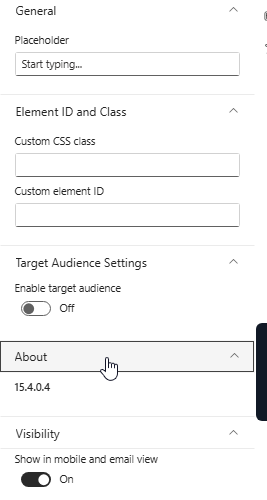
Placeholder is the only setting of this component. It is the grey text shown while the content area is still empty, Start typing... by default.
On a page template that colleagues fill in themselves, this is worth changing. Start typing the procedure here... says more than Start typing..., and it is the cheapest instruction you will ever write: it sits exactly where the person is looking.
7. Audience, styling and mobile visibility
Under Target Audience Settings, switch on Enable target audience if the content should only be visible to part of the organisation, based on your Microsoft 365 groups.
Element ID and Class lets you add a Custom CSS class or a Custom element ID for custom styling, and Show in mobile and email view under Visibility controls whether the component also appears in the mobile app and in email views.
8. Result
Your page now carries formatted content that you maintain straight on the page. Check the result after publishing: as an editor you see the content area with its toolbar, your visitors see only the text.
For related topics, see How to add a component on a page? and How to change the title of a component?
Involv version 5.4