
1. Overview
The Involv Me component is the header of a personal page. It shows the signed-in user their own profile photo, display name and email address, so the page immediately reads as their page rather than a generic one.
It is normally placed at the top of a personal page, above components such as My apps, My Email, My Calendar, My Documents and My Tasks. Because the component renders for the signed-in user, one page serves the whole organisation: every user sees their own details.
Alongside the identity block, the component can show shortcuts to the personal Microsoft 365 content a user needs most: their OneDrive, their Involv profile and Delve. Each shortcut can be switched on or off, so you decide which destinations fit your intranet.
2. What you'll learn
- How to add the Involv Me component to a personal page
- How to choose which personal shortcuts are shown
- How to replace the default page title with the component
- Where to limit the component to a specific audience
- How to apply caching and custom styling to the component
3. Add the Involv Me component to a personal page
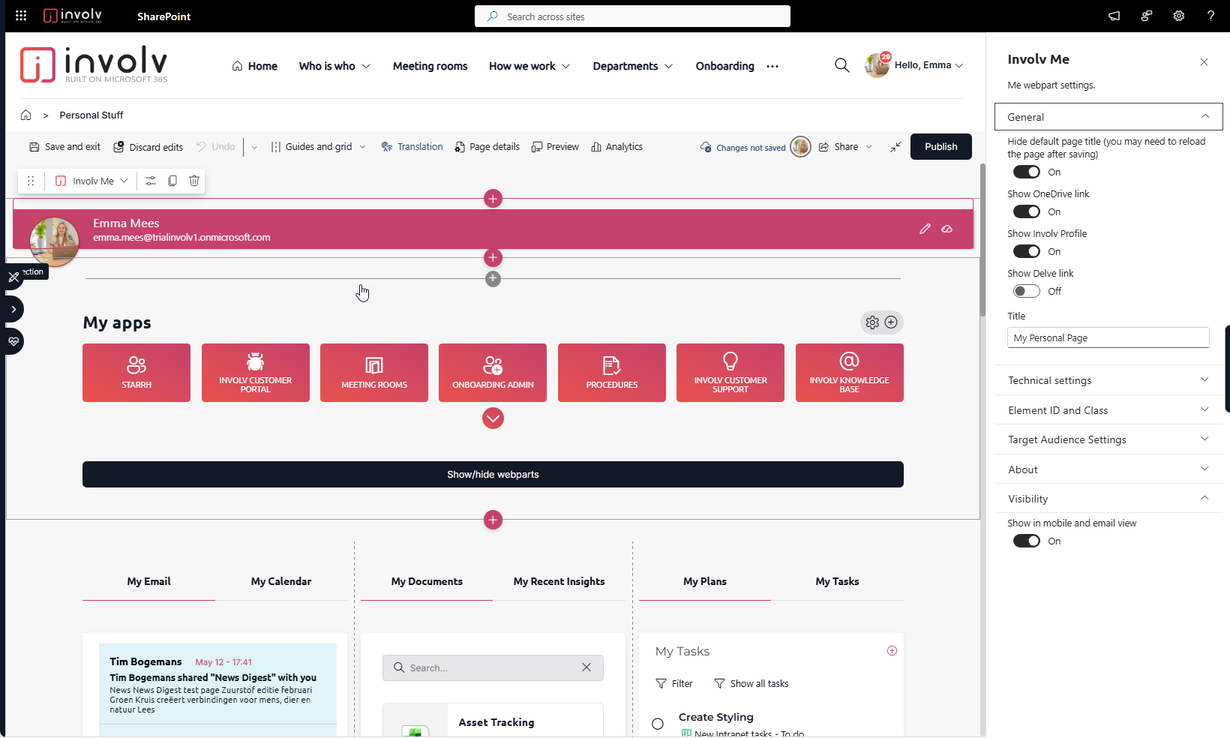
Open the personal page in edit mode and click the + to add a component. Search for Involv Me and select it. Place it in the top section of the page: the component works as a header, so anything above it competes with the user's own name and photo.
Once the component is on the page, click the pencil icon on the component toolbar to open the Involv Me settings panel on the right. The panel is grouped into General, Technical settings, Element ID and Class, Target Audience Settings, About and Visibility.
4. Configure the general settings
The General group holds the settings that determine what the user actually sees.
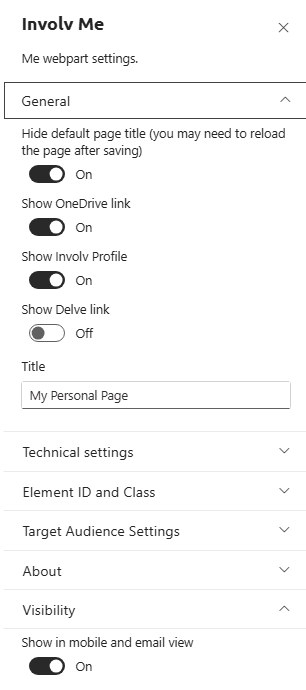
Hide default page title removes the standard SharePoint page title, so the Involv Me block becomes the visual header of the page. This is the usual choice for a personal page, because the user's own name is a more useful heading than the page name. After saving, reload the page to see the change applied.
Show OneDrive link, Show Involv Profile and Show Delve link each add a shortcut for the signed-in user. Switch on the destinations your organisation actually uses and leave the rest off — a header with three competing links is harder to scan than one with a single clear destination. If your intranet uses the custom profile page, Show Involv Profile is the most relevant of the three; Delve is switched off by default.
Title sets the title of the component itself, for example My Personal Page. Note that this is the component title, not the page title you removed with Hide default page title.
5. Limit the component to a specific audience
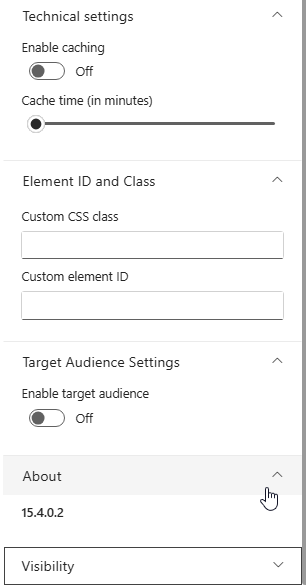
Under Target Audience Settings, switch on Enable target audience if only part of the organisation should see the component. This uses the same audience targeting as the rest of Involv intranet, based on your Microsoft 365 groups.
For a personal page this is usually left off: the component already personalises itself per user, so there is rarely a reason to hide it from anyone.
6. Apply caching, styling and mobile visibility
Technical settings contains Enable caching and Cache time (in minutes). Caching reduces the number of calls the component makes, at the cost of showing slightly older data. Because the Involv Me component mainly renders profile information that rarely changes during a session, caching is safe to enable when you want to lighten the load on a busy personal page. Leave it off if you want the component to always reflect the most recent profile data.
Element ID and Class lets you add a Custom CSS class or a Custom element ID. Use these only when your organisation applies custom styling; they are meant for styling hooks, not for configuration.
Under Visibility, Show in mobile and email view controls whether the component also appears in the mobile app and in email views. Keep this on for a personal page, since the personal overview is exactly what users look for on mobile.
The About group shows the version of the component, which is useful when reporting an issue to support.
7. Result
After saving and publishing the page, every user opening the personal page sees their own photo, name and email address at the top, followed by the shortcuts you enabled. One page configuration serves every user in the organisation.
For related topics, see How to configure the custom Profile Page and How to edit my profile.
Involv version 5.4