
1. Overview
The Involv OneDrive component shows users their own OneDrive files on an intranet page, with a search bar to find a document without opening OneDrive itself. When there is nothing to show, the component says No files found.
The component has no source settings: it reads the OneDrive of the person visiting the page. One page configuration therefore serves the whole organisation, everyone sees their own files, and no permissions have to be arranged. It works well on a personal page, alongside components such as Involv Me, My Tasks and the Involv Graph Calendar.

2. What you'll learn
- How to add the Involv OneDrive component to a page
- How to set the title and the search bar
- How to choose how many files are retrieved
- How to pick the template for the file list
- Where to limit the component to a specific audience
3. Add the Involv OneDrive component to a page
Open the page in edit mode and click the + to add a component. Search for Involv OneDrive and select it. Click the pencil icon on the component toolbar to open the settings panel on the right.
The panel is short, because there is no source to configure: General, Element ID and Class, Target Audience Settings, About and Visibility. Note that this component has no Technical settings group with caching options.
4. Configure the list
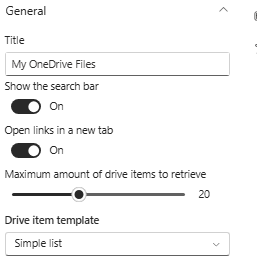
Title is the heading above the list, for example My OneDrive Files. Because every visitor sees their own documents, a title in the first person reads naturally here.
Show the search bar puts a search field above the list. Leave it on: the value of this component is finding a file quickly, and that only works if people can search.
Open links in a new tab determines what happens when a user clicks a file. Switching it on keeps the intranet page open behind the document, which is usually what you want.
Maximum amount of drive items to retrieve sets how many files the component fetches. Keep it reasonable: this is a shortcut to recent work, not a file explorer.
Drive item template sets the layout of the list. Simple list shows the files as plain rows.
5. Limit the component to a specific audience
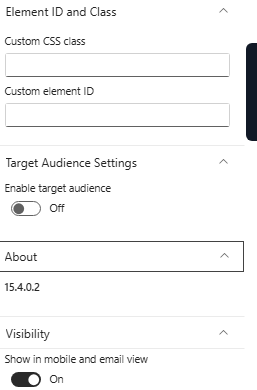
Under Target Audience Settings, switch on Enable target audience if the component should only be visible to part of the organisation. This uses the same audience targeting as the rest of Involv intranet, based on your Microsoft 365 groups.
For a personal overview this is usually left off: the component already personalises itself per user.
6. Apply styling and mobile visibility
Element ID and Class lets you add a Custom CSS class or a Custom element ID. Use these only when your organisation applies custom styling; they are meant for styling hooks, not for configuration.
Under Visibility, Show in mobile and email view controls whether the component also appears in the mobile app and in email views. Keep it on: getting to your own documents is exactly what people want from a phone.
The About group shows the version of the component, which is useful when reporting an issue to support.
7. Result
Users now reach their own documents straight from the intranet, and find them back through the search bar without opening OneDrive. One page configuration serves everyone.
For related topics, see How do you configure the Involv Me component in Involv intranet? and How to add a component on a page?
Involv version 5.4